Connections
Connections link a product from the Huntbase catalog (an EDR, SIEM, cloud account, object storage bucket, ticketing tool, and so on) to your own deployment of it. Once a connection exists you can query it from the query workspace, let Scout reason over it, and use it in hunts.
Open Connections from the sidebar. The page is your list of connections. New connection in the header switches it to the Add a source view, and Back to your connections returns to the list. If you have no connections yet, the page opens on Add a source. Whether data is arriving from each telemetry source you ship is on the Telemetry page. Old links to Connections › Telemetry open it.
Your connections
A list of the connections you have — not the catalog. Each row shows the connection and its product, which direction the data moves, which organization owns it, its health, and which query languages it supports.
- The Health column sorts by severity, so one click on the header brings the problems to the top.
- The filter narrows to Needs attention, Query sources or Destinations. "Needs attention" means a connection has recent consecutive failures or is disabled — a connection that has simply never been checked is not counted, because unknown is not the same as broken.
- Click a row to open its product page, where the connection can be edited, tested or deleted.
A lake store is a lake you own that Huntbase reads. Huntbase never sends events to it: every ingest key sends to the Huntbase data lake. Whether queries read each lake is on Telemetry › Destinations.
Where the Telemetry page is available, ingest keys are managed on Telemetry › Sources. Otherwise Telemetry ingest keys are listed underneath your connections, because a key is the same kind of thing as a connection: a way data reaches Huntbase that you own and might revoke. See Data lake.
The line at the top of the page is the summary: how many connections you have, how they split between query sources and destinations, how many ingest keys are active and whether anything has arrived on them. When something needs attention it appears there as a button that takes you straight to the filtered list.
Which way does the data move?
There are two ways Huntbase sees your data, and most estates use both.
| What it means | What you need | |
|---|---|---|
| Query source | Huntbase holds a credential and calls the vendor when a query runs. Nothing is copied here until you ask a question — and the answer is only as complete as what that API will return. | A token or key from the vendor. |
| Destination | A lake you own that Huntbase reads directly, in place. Huntbase never writes to it: telemetry you ship with an ingest key goes to the Huntbase data lake. | An Apache Iceberg store, or nothing at all if you only ship telemetry — see below. |
Every connection row says which it is, and a destination's product card is badged DESTINATION in place of its category.
Add a source
Click New connection in the page header. The Add a source view opens with the three ways in:
| Choice | What it does |
|---|---|
| Connect a source we query | Browse the catalog below and pick a product. |
| Point us at a lake you own | Goes straight to setup for an Apache Iceberg store. |
| Send us telemetry | Where the Telemetry page is available, Set it up in Telemetry opens Telemetry › Sources. Otherwise it shows the ingest endpoint — full URL, host, port, path, and the auth header — plus a curl that checks it is reachable, and a button to mint a key. |
Sending telemetry to Huntbase
You do not need a store of your own. A telemetry ingest key comes with ready-to-paste configuration for Fluent Bit, Vector, rsyslog or syslog-ng. Create one with New ingest key on the Telemetry page, or from Send us telemetry where that page isn't available. Events land in Huntbase's managed store and are queryable with KQL (Huntbase Lake) alongside everything else.
The endpoint is shown before you mint anything (on Telemetry › Sources, under Ingest endpoint), and the reachability check needs no key — so you can run it from the machine that will do the shipping first. For the full path, and for bringing a lake of your own that Huntbase queries in place, see Data lake.
If you cannot see any ingest keys, that may be because your role cannot list them rather than because none exist.
Browse the catalog
Beneath the three choices, the catalog is filtered on three independent axes that compose:
| Filter | Shows |
|---|---|
| All / Connected / Available | Everything, products with a connection in your scope, or products you have not connected. The catalog opens on Connected once you have a connection, otherwise on All. Sample data connections don't count: a product only Example Corp has a connection for shows a Sample chip and stays under Available. |
| All products / Query sources / Data destinations | Which direction the product's data moves. |
| Grid / By category | Layout only. |
- Use the search box in the page header to find products by name, vendor or tag.
- Each product card shows the logo, name and category (or DESTINATION), plus a connection counter. Click the counter for that product's connections with their health chips; disabled and simulated connections are marked.
- Click a card to open the product page.
The Scope selector affects the catalog too. When you filter to a specific organization or user, products without a connection in that scope are shown separately as out of scope.
Create a connection
Pick a product in the catalog and click New connection on its product page to start with that product already chosen. To start from the Product step instead, open the ▾ beside New connection on the Connections page and choose Guided setup…. Setup opens as its own page, and the steps depend on the product you pick: Product → Details → Connect → Verify. Connect only appears when the product needs settings or credentials.
The page keeps your progress in its own address. You can close the tab, refresh, use your browser's Back button, or send the link to whoever holds the credentials — the draft is waiting where you left it. Your secrets are the one thing not carried in the link, so anyone resuming it enters those themselves. A link that has lost its product starts again at the Product step.
When Continue is off, the line beside it says what's missing — for example Give the connection a name or Fill in and the required fields still empty.
1. Product (and owner)
- Pick the Product from the grid. Search matches the product name, the vendor and its categories, and products you already have a connection to are marked Connected. A product that only has a sample connection is marked Sample instead.
- Choose the Owner. This decides who can use the connection and the data it produces:
| Owner | Who can use it |
|---|---|
| Organization | Members of that organization. |
| Personal | Only you. Not offered if an organization you belong to has turned personal scope off. |
- For endpoint products such as osctrl, also pick the Environment your agents will enrol into. If no environment is available to you, request access rather than choosing a different owner.
- If the product ships with content packs, the page tells you which queries will sync automatically on the new connection. You can turn these off later from the connection page (see Synchronisation settings).
2. Details
Give the connection a Name — one is suggested for you and you can change it
(for example Production CrowdStrike) — and an optional Description.
3. Connect (only if the product needs it)
One step covers both halves of reaching the product:
- Where it lives — the product's own settings (API endpoint, tenant, region and similar). Optional expert settings sit under Advanced, which opens itself if anything in there is required or already filled.
- What it will accept — the Method the product offers, a Credential
label (for example
Production API Key), and the secrets themselves. Some products offer a no-authentication method; choose it to continue without credentials.
The right-hand rail lists what you need to fetch from the vendor first — which kind of token, which permissions it needs, and the common mistakes — for the products we have guidance for.
You can choose I'll do this later and finish the connection without credentials. It is created, but it cannot run until they are added, and it carries a short setup checklist saying exactly what is outstanding.
4. Verify
Review what will be created — each section links back to the step that owns it, so fixing a typo doesn't mean walking backwards through the whole flow — then click Create & check.
The connection is created and immediately checked, without leaving the page:
| Result | What you see |
|---|---|
| Passed | The connection is healthy and ready to query. |
| Failed | The reason, with Fix the details, Check again and Discard connection. Discarding deletes the connection that was just created, so a wrong credential doesn't leave anything behind. |
| No result | The check was accepted but nothing answered within a minute. The connection exists; check it again from its own page. |
| Can't be checked | Some products declare no connection test. Nothing has confirmed the credential — the first query you run against it will. |
If your organization still has sample data, this step reminds you that it stays until you remove it, and is removed automatically 14 days after your own data starts arriving.
Data lake stores are the exception: creating one does not provision it. See Data lake for what happens after Create & check on those.
Several connections per product
You can create as many connections to the same product as you need — separate tenants, regions or environments, for example. Each connection has its own configuration, credentials, health and stats.
The connection page
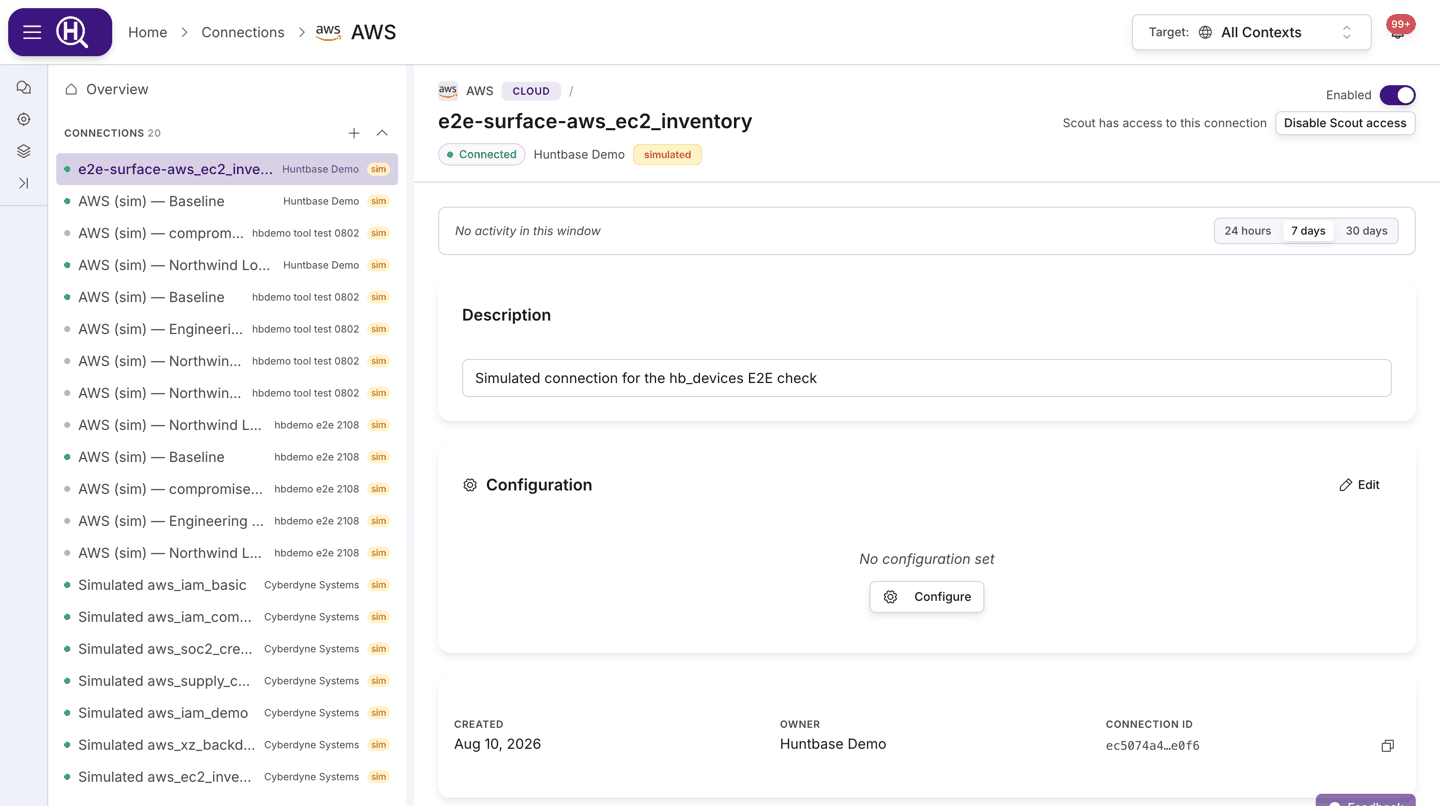
Open a connection from the catalog popover or from a product page. The header shows the product, the connection name (click it to edit inline), the health chip, the owner, and badges such as Disabled, simulated or Not indexed where they apply. If you own the connection you can also:
- flip the Enabled / Disabled switch to make the connection active or inactive (you are asked to confirm), and
- click Enable Scout access / Disable Scout access to control whether Scout can use this connection.
Health
The health chip has four states:
| Chip | Meaning |
|---|---|
| Connected | Recent runs or tests against this connection succeeded. |
| Degraded | Recent runs are partly failing. |
| Error | Recent runs are failing; hover the chip to see the number of consecutive failures. |
| Unknown | No health information yet. |
A Last sync value in the metadata strip shows how long ago the connection last synchronised, alongside Created, Owner and the copyable Connection ID.
Test the connection
For products that support it, a Test connection button appears near the top of the page (and in the Credentials modal). The test uses the connection's default credential; the result arrives as a notification and as an inline pass/fail summary. If no result arrives, the button reports a timeout and lets you try again. New connections are checked automatically as they are created — this button is for re-checking one later.
Statistics
The stats panel summarises activity for a window of 24 hours, 7 days or 30 days. It shows when the last successful run happened, the error rate, latency (p50 and p95, once enough samples exist), and cards for Queries run, Result rows, Entities extracted (with a by-type breakdown) and Hunts using it, plus a Runs over time sparkline.
Description and Configuration
- Description — edit inline. For dynamic-schema connections the description is inferred by Scout from the content unless you edit it yourself.
- Configuration — the product's settings. Click Edit, change values, then Save (or Cancel). Optional fields sit under an Advanced disclosure.
Credentials
Click the Credentials card to open Connection Credentials. The table lists each credential's Label, Auth Mode, Status and Created date, with a Default badge on the one in use.
- Add Credential / Add Another Credential — choose the Authentication Mode, enter a Label and the required secrets, then click Create Credential.
- Use the star action on a row to set it as the default for this connection.
- Use the trash action to delete a credential (you are warned if it is the last one).
Secrets are not shown again after you save them.
Synchronisation settings (content packs)
Products that ship with content packs show a Synchronisation Settings card with the number of queries configured and whether syncing is Enabled or Disabled. Open it to see each pack's queries and their cadence, and use the switch to turn synchronisation on or off for this connection.
Discovered Schema
Connections with a dynamic schema — for example object storage sources such as Amazon S3 or Azure Blob Storage — show a Discovered Schema card. Scout infers the tables and fields from the connection's content.
- The card shows the sync status (Syncing, Completed, Failed or Idle), Total Tables, Processed, Failed and Last Sync.
- Click Sync Schema to run discovery (or re-run it after new files land).
- Expand a table to see its fields and edit its description. Scout infers descriptions unless you edit them; an edited table is badged User Modified, and Discard user edits returns it to the inferred description after a confirmation.
- If discovery failed, the error appears under the card's notice; a table that could not be read shows its own error when expanded, and its description can still be edited.
Webhooks
The Webhooks card shows how many ingestion endpoints are active or paused on this connection and opens the Event Ingestion & Webhooks modal. See Webhooks (event ingestion).
Endpoint Control
osctrl connections show an additional Fleet Status / Fleet Management panel. See Endpoint Control (osctrl).
Delete a connection
Scroll to the Danger Zone and click Delete Connection, then confirm. This permanently removes the connection and its associated data and cannot be undone.
Next steps
- All integrations — per-product setup: what to create in the vendor's console and which languages each serves
- Endpoint Control (osctrl) — deploy osquery agents and manage your fleet
- Webhooks (event ingestion) — push events from external products into Huntbase
- Data lake — bring your own Iceberg store, or ship logs straight to Huntbase
- Telemetry — whether each telemetry source is sending, and its ingest key
- Search telemetry — see the events your telemetry sources sent